


Master the cellular repair workflow for youthful skin
Your skin tells a story, and after 30, that story often includes fine lines, lost firmness, and uneven tone. These visible signs stem from slowed cellular regeneration and accumulated damage at the deepest layers. While countless products promise miracles, cellular repair represents a scientifically backed approach targeting the root causes of aging. This guide reveals a precise workflow using bioactive ingredients like PDRN and peptides to activate your skin’s natural renewal mechanisms, delivering measurable rejuvenation within weeks.
Table of Contents
- Understanding Cellular Repair And Why It Matters
- Preparing Your Skin For Cellular Repair Treatments
- Step-By-Step Cellular Repair Workflow For Skin Rejuvenation
- Monitoring Results And Troubleshooting Common Issues
- Achieve Advanced Skin Rejuvenation With Cellure
- Frequently Asked Questions About Cellular Repair Workflow
Key takeaways
| Point | Details |
|---|---|
| Cellular repair targets damage | This approach activates fibroblasts to boost collagen production and restore skin structure from within. |
| Structured workflow maximizes results | Following preparation, treatment application, and monitoring steps ensures optimal ingredient penetration and efficacy. |
| PDRN modulates multiple pathways | This bioactive ingredient repairs the extracellular matrix while reducing inflammation for comprehensive anti-aging benefits. |
| Consistency delivers visible improvements | With proper technique and patience, expect firmer, smoother skin within 4 to 6 weeks. |
Understanding cellular repair and why it matters
Your skin’s ability to regenerate depends on specialized cells called fibroblasts, which produce collagen and elastin. These proteins form the structural framework keeping skin firm and elastic. As you age, fibroblast activity declines, leading to thinner skin, wrinkles, and sagging. Cellular repair reverses this decline by delivering bioactive ingredients that reactivate these essential cells.
The extracellular matrix (ECM) acts as scaffolding for your skin cells. When this matrix degrades, your skin loses volume and resilience. Repair ingredients like polydeoxyribonucleotide (PDRN) directly address ECM damage by stimulating fibroblasts to produce fresh collagen and elastin. PDRN exerts anti-aging effects through multi-pathway modulation, integrating ECM repair with proteostasis and immune regulation.
Immune modulation represents another critical component. Chronic low-grade inflammation accelerates aging by breaking down collagen faster than your body can replace it. Advanced cellular repair formulations contain ingredients that calm inflammatory responses while promoting healing. This dual action creates an optimal environment for skin renewal.
Think of cellular repair as renovation rather than decoration. Surface treatments provide temporary cosmetic improvements, but cellular repair rebuilds your skin’s foundation. The science behind this approach focuses on three interconnected mechanisms:
- Activating fibroblast proliferation to increase collagen synthesis
- Repairing damaged ECM components for improved structure
- Reducing inflammatory markers that accelerate breakdown
- Enhancing cellular communication for coordinated renewal
“Cellular repair doesn’t just mask aging signs. It addresses the biological processes causing them, delivering improvements that compound over time with consistent use.”
PDRN stands out among repair ingredients because it works through multiple pathways simultaneously. Derived from salmon DNA, this bioactive molecule shares structural similarities with human DNA, allowing it to integrate seamlessly into repair processes. When applied topically in sufficient concentrations, PDRN penetrates to the dermal layer where fibroblasts reside, triggering a cascade of regenerative responses.
The beauty of this approach lies in its compatibility with your skin’s natural biology. Rather than forcing dramatic changes that stress cellular systems, repair ingredients work with existing mechanisms to optimize function. This gentler strategy produces sustainable results without the irritation common to aggressive treatments.
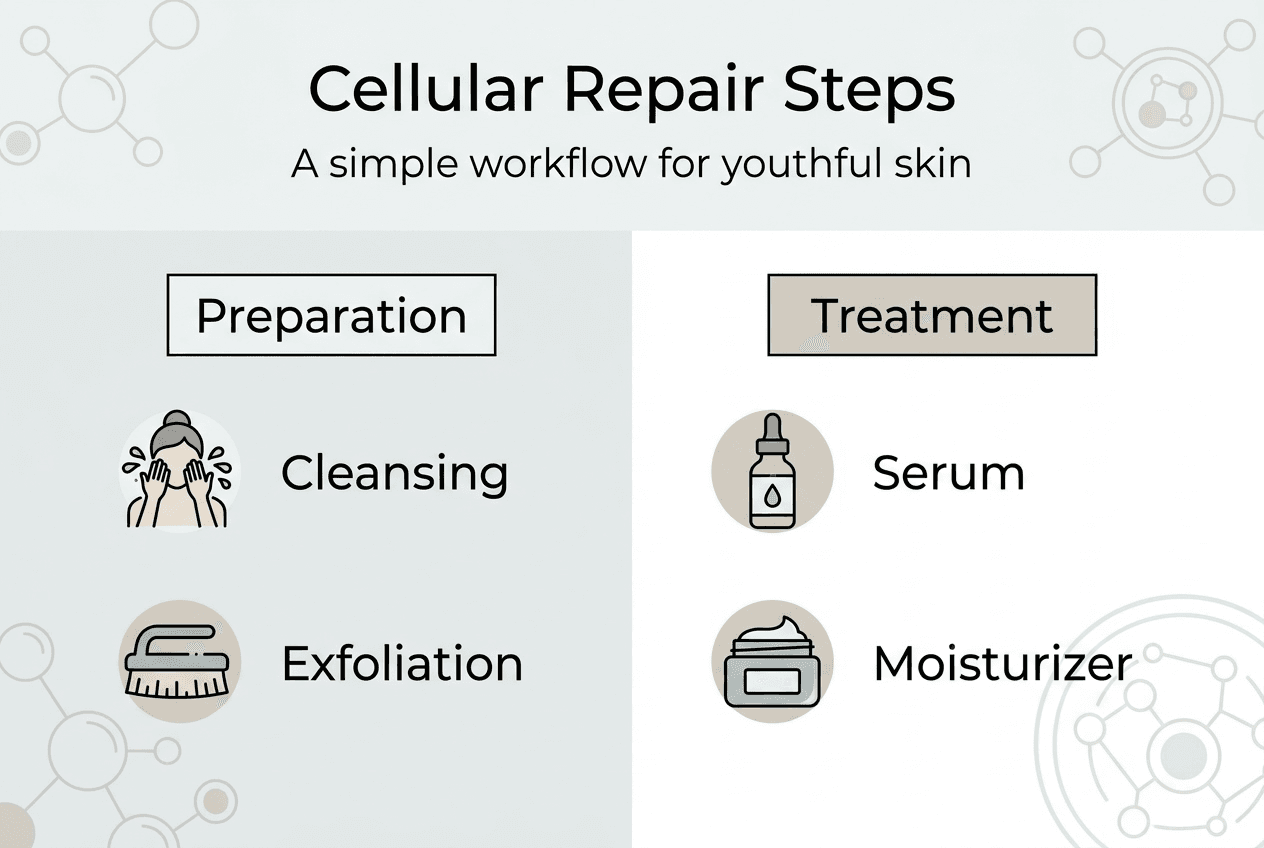
Preparing your skin for cellular repair treatments
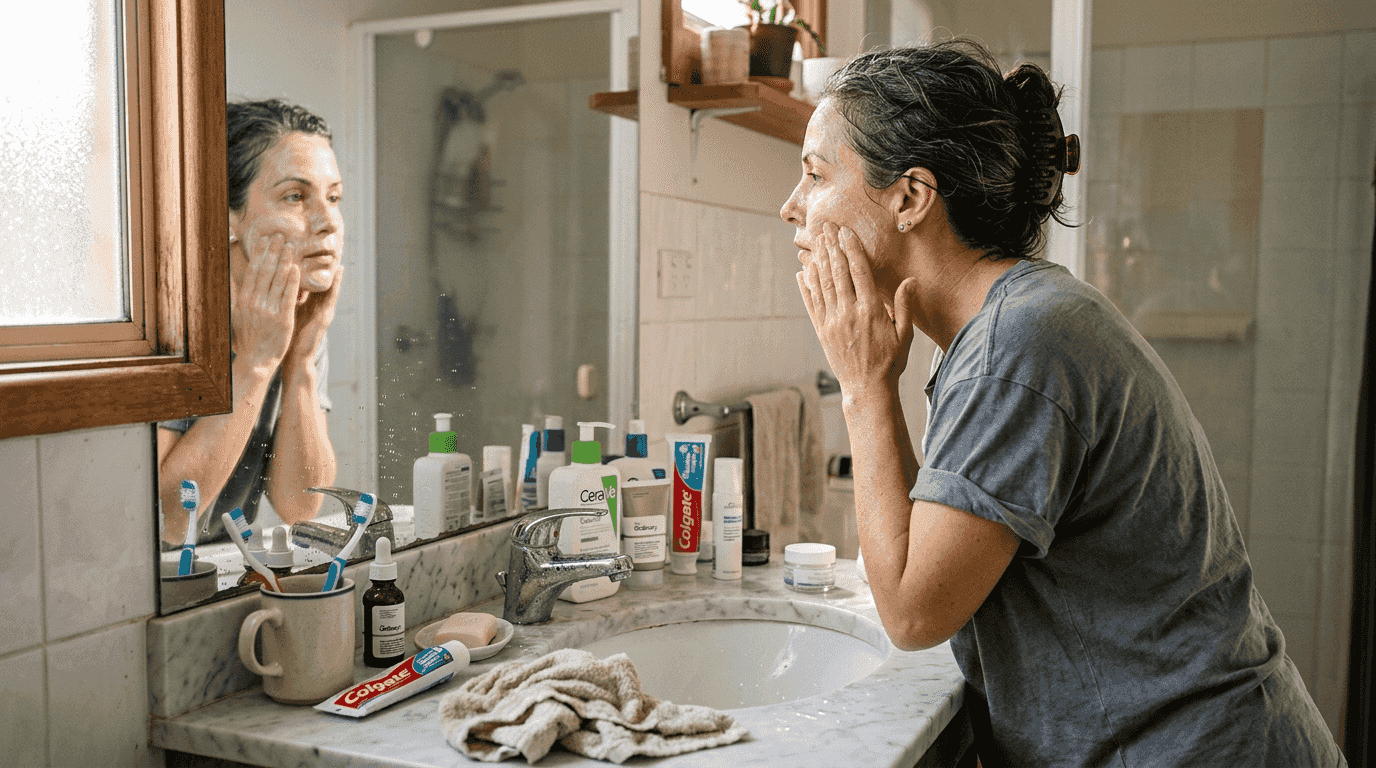
Proper preparation determines how effectively repair ingredients penetrate and perform. Start with thorough cleansing using a gentle, pH-balanced cleanser that removes makeup, sunscreen, and environmental pollutants without stripping your skin’s protective barrier. Double cleansing works well if you wear heavy products, use an oil-based cleanser first, then follow with a water-based formula.
Exfoliation promotes cell turnover and clears the pathway for active ingredients to reach deeper layers. For sensitive skin, choose enzymatic exfoliants containing papain or bromelain rather than physical scrubs. These dissolve dead cells gently without causing micro-tears. Limit exfoliation to two or three times weekly to avoid over-processing.
Toner application balances your skin’s pH after cleansing and primes it for treatment absorption. Look for alcohol-free formulas with hydrating ingredients like hyaluronic acid or glycerin. Pat toner into slightly damp skin rather than rubbing, this technique maximizes hydration while preparing your skin to receive repair serums.
UV protection deserves special attention when using cellular repair treatments. Many bioactive ingredients increase photosensitivity, making your skin more vulnerable to sun damage. Apply broad-spectrum SPF 30 or higher every morning, even on cloudy days or when staying indoors near windows. Reapply every two hours during extended sun exposure.
Your preparation routine should follow this sequence:
- Remove makeup and sunscreen with an oil-based cleanser
- Cleanse thoroughly with a gentle, pH-balanced formula
- Exfoliate two to three times weekly using enzymatic products
- Apply alcohol-free toner to balance pH and boost hydration
- Ensure skin is slightly damp before applying treatment serums
Pro Tip: Wait 60 seconds after toner application before applying repair serums. This brief pause allows your skin to absorb hydrating ingredients fully, creating an optimal environment for active penetration without dilution.
Skin temperature affects ingredient absorption. Slightly warm skin accepts actives more readily than cold skin. If you store serums in the refrigerator, let them reach room temperature before application. You can also warm the product between your palms for 10 seconds before patting it onto your face.
Consistency in preparation builds cumulative benefits. Your skin adapts to regular routines, becoming more receptive to repair ingredients over time. Skipping steps or varying your approach disrupts this adaptation, potentially reducing treatment effectiveness.
Step-by-step cellular repair workflow for skin rejuvenation
Executing your cellular repair routine with precision ensures maximum benefit from each product. This workflow integrates preparation, treatment application, and protection into a seamless sequence that supports natural regeneration cycles.
-
Cleanse thoroughly: Use your gentle cleanser to remove all traces of makeup, sunscreen, and environmental debris. Massage in circular motions for 60 seconds, then rinse with lukewarm water. Pat skin dry with a clean towel, leaving it slightly damp.
-
Apply targeted serums: Dispense 2 to 3 drops of your PDRN or peptide serum onto fingertips. Press gently into skin using upward motions, focusing on areas showing aging signs. Allow 90 seconds for absorption before proceeding.
-
Layer hydrating treatments: Follow with a hyaluronic acid serum or essence to lock in moisture and support the skin barrier. This step prevents transepidermal water loss that can compromise repair processes.
-
Seal with moisturizer: Apply a moisturizer containing ceramides or niacinamide to reinforce your barrier and provide sustained hydration. Use gentle pressing motions rather than rubbing to avoid disrupting the layers beneath.
-
Protect with sunscreen: In morning routines, finish with broad-spectrum SPF. At night, skip this step and allow repair ingredients to work undisturbed during your sleep cycle.
Timing matters significantly. Evening application aligns with your skin’s natural repair cycle, which peaks during sleep. Your body directs more resources to cellular regeneration when you’re resting, amplifying the effects of topical treatments. Morning application focuses on protection and maintenance rather than intensive repair.
Frequency depends on your skin’s tolerance and the concentration of active ingredients. Start with once-daily application, preferably at night. After two weeks, assess your skin’s response. If you experience no irritation, you can increase to twice daily, morning and evening.
| Application Step | Duration | Key Focus |
|---|---|---|
| Cleansing | 60 seconds | Remove all impurities without stripping |
| Serum absorption | 90 seconds | Allow penetration before next layer |
| Moisturizer sealing | 30 seconds | Lock in actives with barrier support |
| Total routine time | 5-7 minutes | Consistency over speed |
Pro Tip: Apply serums to slightly damp skin for enhanced penetration. The moisture creates channels that help active ingredients reach deeper layers more effectively, but avoid applying to dripping wet skin, which can dilute concentrations.
The cellular repair workflow works best when you maintain consistent timing. Your skin develops circadian rhythms that anticipate treatment at specific times. Varying your schedule disrupts these patterns and may reduce efficacy.
Product layering order follows the thin-to-thick rule. Water-based serums go first, followed by emulsions, then creams. This sequence ensures lighter products aren’t blocked by heavier formulations. When using multiple serums, apply the most potent cellular repair formula first, while your skin is most receptive.
Consider investing in a complete repair kit that includes coordinated products designed to work synergistically. These systems eliminate guesswork about compatibility and optimal sequencing, ensuring each component enhances rather than interferes with others.
Monitoring results and troubleshooting common issues
Recognizing effective cellular repair requires understanding what improvements to expect and when they typically appear. Initial changes often occur at the cellular level before becoming visible, so patience proves essential during the first few weeks.
Signs of successful repair include improved skin texture, with a smoother feel when you run your fingers across your face. Increased elasticity becomes noticeable around week three, your skin bounces back more quickly when gently pressed. Fine lines soften as collagen production ramps up, though deeper wrinkles take longer to respond. Many users report a subtle glow resulting from enhanced cellular turnover and better moisture retention.
Consistent use leads to improvements in firmness and texture within four to six weeks. Collagen synthesis requires time, as your fibroblasts must produce, process, and integrate new proteins into the existing matrix. Rushing this biological process through excessive product use can cause irritation without accelerating results.
Common issues and their solutions:
- Mild tingling or warmth: Normal during the first week as skin adjusts to bioactive ingredients; subsides with continued use
- Dryness or flaking: Indicates barrier compromise; reduce frequency to every other day and increase moisturizer application
- Persistent redness: May signal sensitivity to specific ingredients; discontinue use and consult a dermatologist
- No visible changes after 8 weeks: Check product concentration and application technique; consider professional consultation
Patch testing prevents adverse reactions. Apply a small amount of new product to your inner forearm or behind your ear. Wait 24 hours and check for redness, itching, or swelling. This simple step identifies sensitivities before applying products to your entire face.
Documenting your progress helps track subtle improvements that might otherwise go unnoticed. Take photos in consistent lighting every two weeks, using the same angle and distance. Compare images after six weeks to see cumulative changes that daily mirror checks might miss.
| Timeline | Expected Changes | Action Required |
|---|---|---|
| Week 1-2 | Improved hydration, subtle texture smoothing | Continue routine, monitor for irritation |
| Week 3-4 | Increased elasticity, reduced dullness | Maintain consistency, document progress |
| Week 5-6 | Visible fine line softening, firmer feel | Assess results, adjust routine if needed |
| Week 7-8 | Continued improvement in tone and texture | Establish long-term maintenance plan |
Adjusting product usage addresses most issues without abandoning your routine entirely. If you experience mild irritation, reduce application frequency rather than stopping completely. Your skin often adapts within a week or two, allowing you to resume daily use. For persistent problems, consult a dermatologist who can recommend modifications based on your specific skin type and concerns.
Some people expect dramatic overnight transformations similar to professional procedures. Cellular repair works differently, building improvements gradually through biological processes that can’t be rushed. Setting realistic expectations prevents disappointment and helps you appreciate the steady progress occurring beneath your skin’s surface.
Maintaining results requires ongoing commitment. Once you achieve your desired improvements, continue using repair products at maintenance levels, typically three to four times weekly. Stopping treatment entirely allows cellular activity to decline again, gradually reversing your gains.
Achieve advanced skin rejuvenation with Cellure
Implementing an effective cellular repair workflow becomes simpler when you have access to scientifically formulated products designed specifically for this purpose. Cellure specializes in advanced skincare solutions that target aging at the cellular level, using clinically supported bioactive ingredients to deliver measurable results.
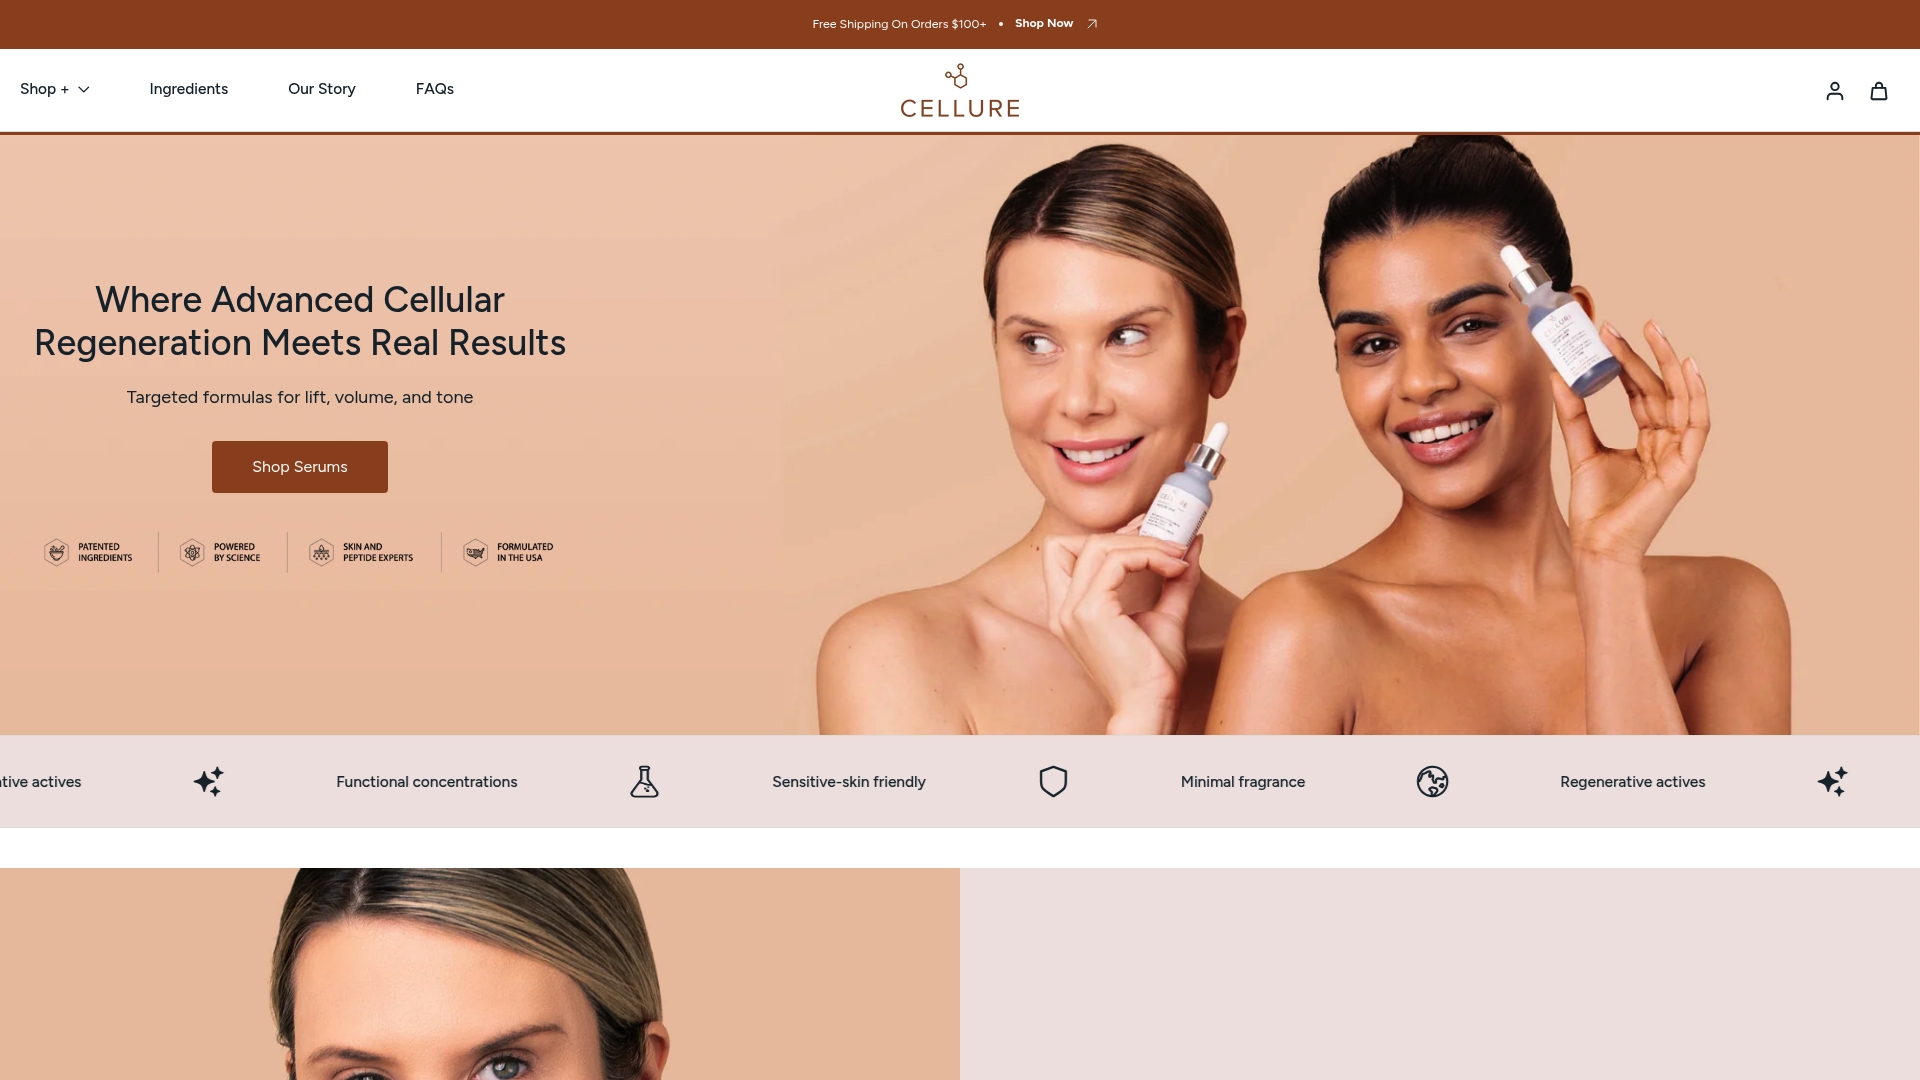
The Complete Skin Repair Kit provides everything you need to execute the workflow outlined in this guide. Each component works synergistically with the others, ensuring optimal ingredient penetration and cellular activation. The kit includes targeted serums with PDRN and peptides, supporting treatments, and detailed usage instructions.
For those seeking to address specific concerns, the Tranexamic Acid Peptide Serum combines brightening and repair benefits in one powerful formula. This serum integrates seamlessly into any cellular repair routine, enhancing overall results while targeting uneven tone and discoloration.
Explore the full range of regenerative solutions at Cellure, where advanced science meets practical skincare for individuals over 30 who demand proven results. Each product undergoes rigorous testing to ensure it delivers on its promises, giving you confidence in your investment.
Frequently asked questions about cellular repair workflow
What is the best time of day to perform cellular repair skincare?
Evening application aligns with your skin’s natural repair cycle, which peaks during sleep when your body directs maximum resources to cellular regeneration. Morning routines should focus on protection with antioxidants and sunscreen rather than intensive repair treatments.
How long does it take to see results from a cellular repair routine?
Most people notice initial improvements in texture and hydration within two to three weeks. Visible changes in firmness and fine lines typically appear after four to six weeks of consistent use, as collagen synthesis requires time to produce measurable structural improvements.
Can cellular repair treatments be combined with other anti-aging products?
Yes, but layer products carefully to avoid overwhelming your skin. Apply cellular repair serums first on clean skin, then follow with complementary treatments like retinoids or vitamin C. Wait 90 seconds between layers for proper absorption and monitor for any signs of irritation.
Is PDRN safe for sensitive skin types?
PDRN generally works well for sensitive skin because it mimics natural biological processes rather than forcing dramatic changes. However, individual responses vary, so patch testing remains essential before full-face application. Start with lower concentrations and gradually increase as your skin builds tolerance.
Do I still need sunscreen when doing cellular repair?
Absolutely. UV protection is critical when using cellular repair treatments, as many bioactive ingredients increase photosensitivity. Apply broad-spectrum SPF 30 or higher every morning to protect your investment in skin health and prevent new damage from undermining your repair efforts.
Recommended
Share